
I got several comments and emails after my Mug Rug post asking about the binding and how to do it completely by machine. So here you go!

Square up and trim the edges of your mug rug first and the you are ready to attach the binding. If this is your first go at machine binding, try it on a smaller piece like a mug rug or table runner. I use a walking foot and it makes it very easy. I also change my needle position to the closest to the machine. You may have to experiment with this...
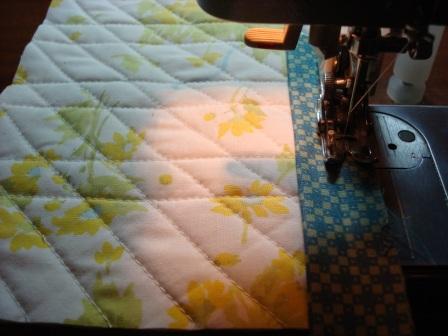
With the raw edge of your binding lined up with the raw edge of your work, take your binding strip and attach it to the back of your work. This is different than traditional binding but personally, I care more how the stitches look on the front than on the back. I would rather have straight stitches holding the binding down on the front.
Leave a "tail" {approx 2-3"} of your binding so don't start stitching right at the beginning of your strip. Doing this will make it easier to connect your strips together at the end. Stitch to the first corner and stop 1/4" from the edge. Backstitch and cut your threads.

Take your binding and fold up so that it now lines up with the next side your work.

Keeping that fold, then fold down so that your binding is lined up nicely on the next side. Return your work to the machine and begin stitching 1/4" from the corner. That's it! Repeat on each side until you get to the side you began on.

Once you get to the original side, stop stitching to leave another approx 2" "tail". At this point you will probably have to trim the tails; just make sure you leave enough for them to overlap each other by 2 inches.

Now, with one tail {#1} laying flat, overlap the other one {#2} and measure 1/2" from the end of #1

Overlap #2 and mark that 1/2" on #2 and then cut along that line. You are now ready to stitch the two strips together to finish your binding!

Open both strips up and with right sides together and pin.

Stitch with a 1/4" seam

Fold your binding again and press if needed.

Return the piece to your machine and stitch, backstitching at the beginning and end, the rest of your binding down. You are now ready to attach the binding to the front!

With binding clips or straight pins, fold the binding over to the front and secure. Continue around the entire piece. At each corner you want a nice "V" where the point of the binding touches the previous edge. {This will make much more sense as you do it!}

Once you have all the edges secured return to your machine. With a stitch running very close to the edge of the binding, begin to stitch. When you get to the corner, stitch far enough to secure the fold then with your needle down, lift your presser foot and turn your work to start the next side. Lower your presser foot and continue on the next side. Repeat until your binding is secure.
*Make sure you remove your pins or binding clips as you go. Don't even try to stitch over them or you will have a mess on your hands!*
Done!

Trim your threads and enjoy your work! If you have any questions, feel free to comment here or email me :)
PS: My first mug rug sold so I've listed this one in my shop...