
Signature blocks are so much fun to exchange! I made these for my daughter's class for them to sign. I made a quilt from them and we presented it to her on the last day of school.
Here is what you need:
- 2 yards of Kona White or bleached quilter's muslin {for the siggy blocks & sashing}
- Assorted fat quarters or scraps
- Freezer paper {to stabilize the fabric for signing}
- Batting of your choice
- 3 yards of your choice for the quilt backing
- 1 yard of your choice for binding
- Thread to match
- Pigma pens or markers {for signing the blocks} *You can buy these at Joann's, Hobby Lobby, etc
- Ruler, pins, iron, scissors, rotary cutter, etc...
- Cut 20 5" squares out of the white.
- Cut 20 matching sets of strips {40 total} that measure 2.5"x 5".
- Cut 20 matching sets of strips {40 total} that measure 2.5" x 9".
- I cut one additional 2.5" x 9" from each fabric when I was cutting the strips. These extras will be for my binding... :)

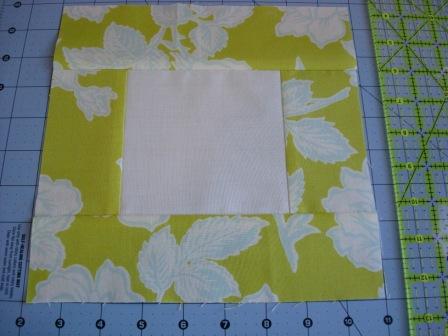
Now you are ready to sew your signature {siggy} blocks! Grab 1 white square and 2 matching strips that measure 2.5" x 5". Sew those on opposite sides of your white square. Open and press seams toward the darker fabric.


Next you will need 2 strips that measure 2.5" x 9". They will be slightly longer than the block edges but that's OK. Sew those to the other two sides of your square. Open and press seams again.
Square your block and you now have one 9" block done! You can continue this process block by block or you can chain piece the rest of your blocks which makes this process go much quicker.
Once you are done with all of your blocks, cut 5" squares of freezer paper and iron each square to the back of your block. This will make it much easier for the little hands writing their names on their block!
I completed these blocks by sashing them with white. Cut 2" x 9" strips and 2" x 11.5" strips and just like you sewed the other strips, sew these strips onto the block as well.
Sew the blocks together in rows and sew the rows together to complete your quilt top. Baste and quilt as desired. Use your extra strips that you cut to bind your quilt!
*Helpful hints:
- I picked 20 different fat quarters because I wanted each child to have a unique block. You can use as few as 5 fat quarters to cut your strips from.
- If you have a small number of kids or an odd number, consider making blocks that the parents can sign too.
- Make extra blocks to be signed to allow for mistakes.
- I highly recommend making the blocks before the kids sign them. That will eliminate someone writing in the seam allowance and getting their signature cut off.
- Make sure the pens/markers you are using are Pigma/Acid free/Waterproof/Washable
You can see the finished quilt here...