Previous Chasing Chevrons posts:Quilt designPart 1HST triangle tutorialPart 2
Welcome to Week 3! Didn't ya'll have so much fun making all those HSTs and chevron blocks? Me too.
This week we will be assembling our quilt top. This is where it gets fun {or at least I think so} because all your hard work starts to look like an actual quilt.
So you have your stack of 60 chevron blocks pressed and ready to go, right? We will be using 59 of them for the top. Set the last one aside... we will be using it as a part of the quilt back.
Remember the other 84 solid blocks that we cut and set to the side? If you don't, that's OK. Just refer back here for those instructions. These blocks will make up your background for the chevrons to contrast against.
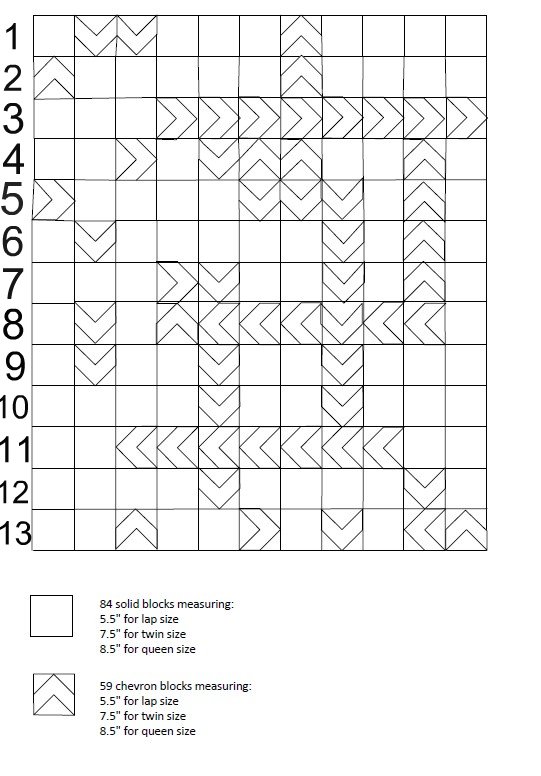
There are lots of different ways for piecing a quilt top together... this is just how I do it. Go ahead and lay out all of your blocks as shown in the picture above. It helps me to go row by row like you see them numbered.
If you want a different layout then go for it! Just make sure that your blocks are laid out 11 rows across x 13 rows down to get the correct quilt size.
Now it's time to stitch your blocks together with a scant 1/4" seam allowance. Start with row 1. My preference is to press the seams open. Repeat this process for rows 2 -13.
Once you have all your rows done, you are ready to sew your rows into sections. For this quilt I decided to make 4 sections:
stitch row 1 to 2 to 3
stitch row 4 to 5 to 6 to 7
stitch row 8 to 9 to 10
stitch row 11 to 12 to 13

Match your seams up as shown.

I'm not big on pins but I highly recommend pins here because it's no fun to have a wonky or wavy quilt top. Butt the seams up against each other and pin. Pin your rows together and sew. Make sure you remove your pins as you go... don't sew over them!
Don't stress if the ends of your rows don't match up. It's far more important to have your seams match! We can always square up the quilt top to fix the rows.
Keep going until you have your 4 sections. Press your seams open again and from here it's super easy.
Following the same pinning and stitching instructions, sew section 1 to 2 and then section 3 to 4 to leave 2 large sections.
Stitch your final 2 sections together, press and you have your completed quilt top!
Have fun completing your top and be sure to post your progress in our Flickr group. As always, if you have any questions just comment here on this post, in the Flickr group or email me.